How to Start
Follow these steps to connect your company data to BusinessInsight and view it on mobile dashboards. The guide is written for business users, so each step explains what to click, where to place the Agent launcher, and where to enter the database connection string.
BusinessInsight uses a small local Agent to read your existing business database and send approved dashboard data to the hosted BusinessInsight site. After setup, your users sign in from a phone and see the dashboards assigned to their role.
Before You Start
Keep these items ready before you begin. Having them available prevents most setup delays.
You Need
- A Windows computer or server that can reach your company database.
- The database name, server name, and sign-in method used by your business software.
- A read-only database user when a username and password are required.
- The local database type, such as SQL Server, PostgreSQL, MySQL, Oracle, SQLite, or ODBC.
- Your BusinessInsight trial signup details after registration.
You Do Not Need
- You do not need to replace your existing business software.
- You do not need to manually prepare mobile reports.
- You do not need to open inbound firewall access to your database.
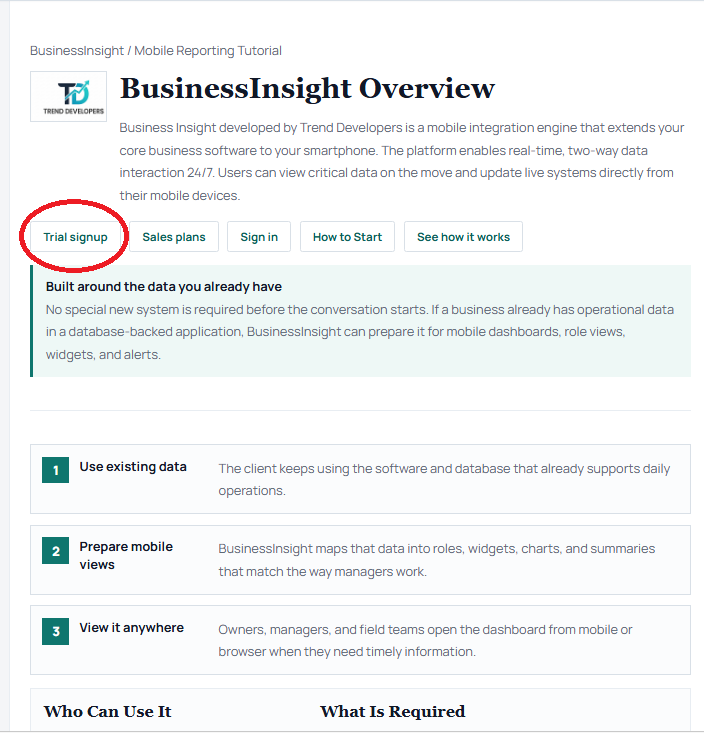
1. Request Trial Signup
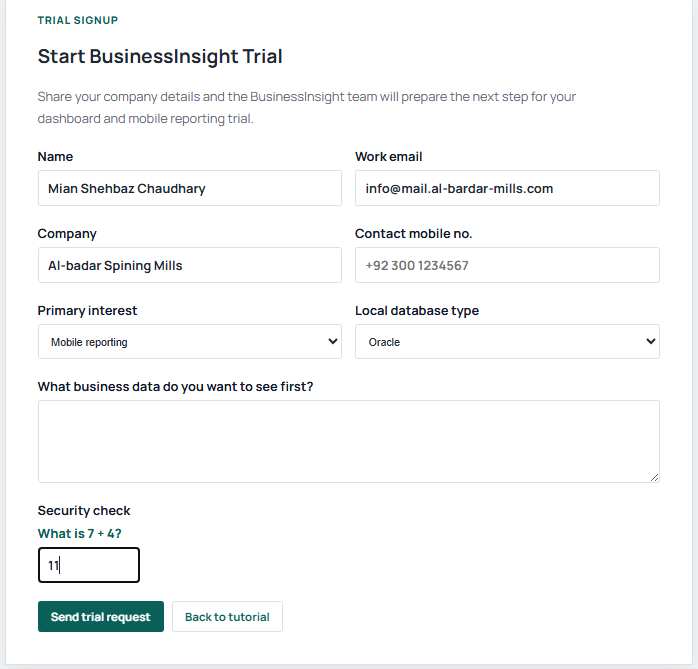
Click Trial signup from the top menu or from this page. Enter your name, work email, company name, mobile number, local database type, and the area where you want mobile reporting first.
After submission, BusinessInsight creates your company trial record and prepares the identifiers used by the local Agent.
The success page shows important setup values and a company-specific launcher download. The launcher is the file you will edit later with your local database connection string, so save it before closing the browser.
2. Save Your Setup Details
After trial signup, copy the setup values into a safe place for your admin or IT helper. These values connect your company, local Agent, and first admin user.
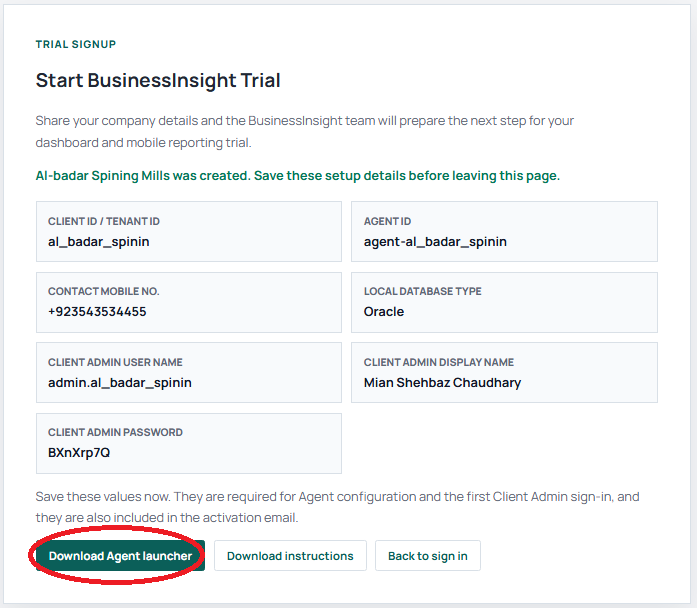
| Detail | What It Means | Where You Use It |
|---|---|---|
| Tenant ID or Client ID | Your company identifier inside BusinessInsight. | Already included in the downloaded Agent launcher. |
| Agent ID | The identity of the local Agent that will connect your database. | Already included in the downloaded Agent launcher. |
| Local database type | The database provider selected during trial signup. | Used to generate the sample connection string inside the downloaded Agent launcher. |
| Client Admin user name | The first admin account for your company. | Sign in to manage roles, users, widgets, and dashboards. |
| Client Admin password | The temporary password created for the first admin user. | First sign-in after the Agent is running. |
Treat admin credentials like private business information. Share them only with the person responsible for the first setup.
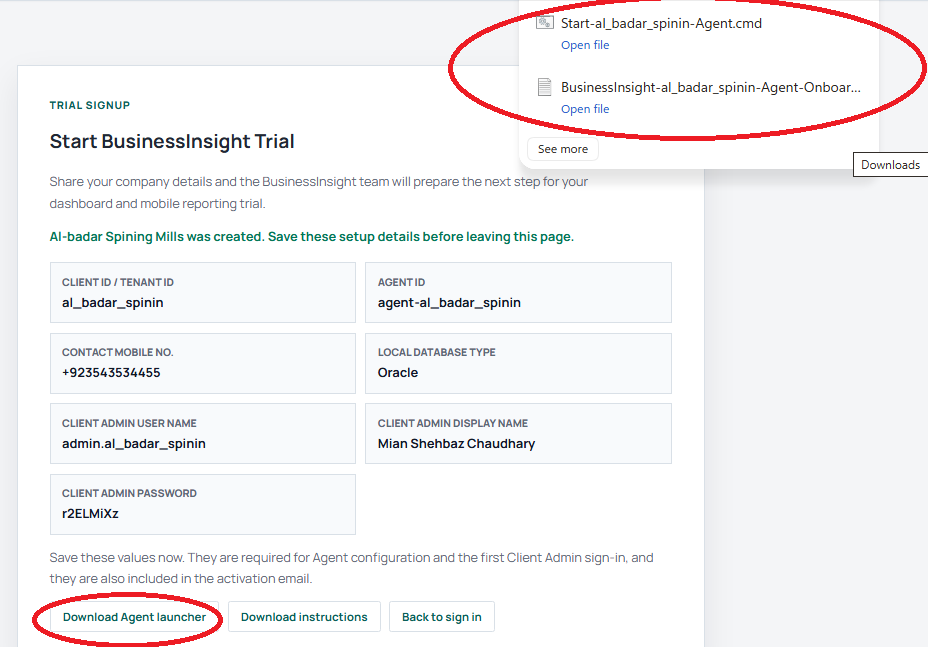
3. Download the Agent Launcher
The Agent launcher is created for your company after trial signup. Its file name usually starts with Start- and includes your tenant name. This launcher is where your client database connection string is entered.
What to Do
- On the trial success page, click Download Agent launcher.
- Open your Downloads folder and find the downloaded .cmd file.
- Keep this file ready. You will copy it into the Agent folder, then edit the connection string inside this launcher file.
Why It Matters
The launcher carries your Tenant ID, Agent ID, BusinessInsight site address, selected database type, and one editable sample connection string for your local database.
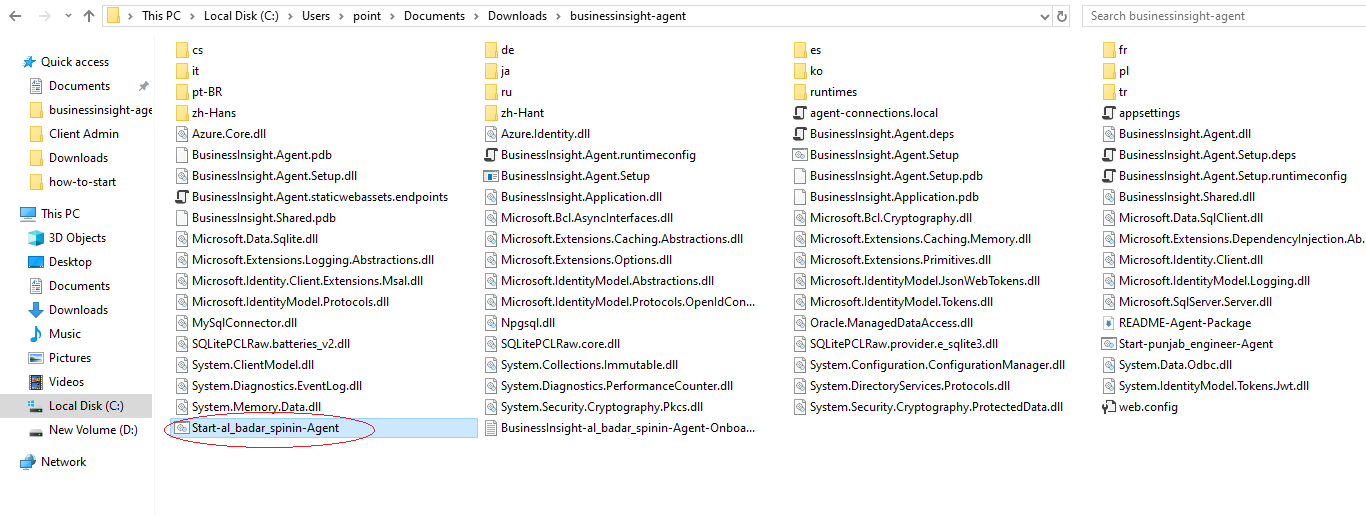
4. Download and Prepare the Agent Folder
The Agent package is the folder that runs on your computer or server near your database. Download it once, unzip it, and keep the folder in a stable location such as C:\BusinessInsight\Agent or another drive folder your company uses for software tools. The package does not need your client database connection string until you copy in and edit the launcher.
Use the Download Agent package link and save the zip file.
Right-click the zip file, choose Extract All, and select a permanent folder.
Move the downloaded Start-<tenant>-Agent.cmd file into the same folder that contains BusinessInsight.Agent.dll. Keep one launcher and one client database connection string in each Agent folder.
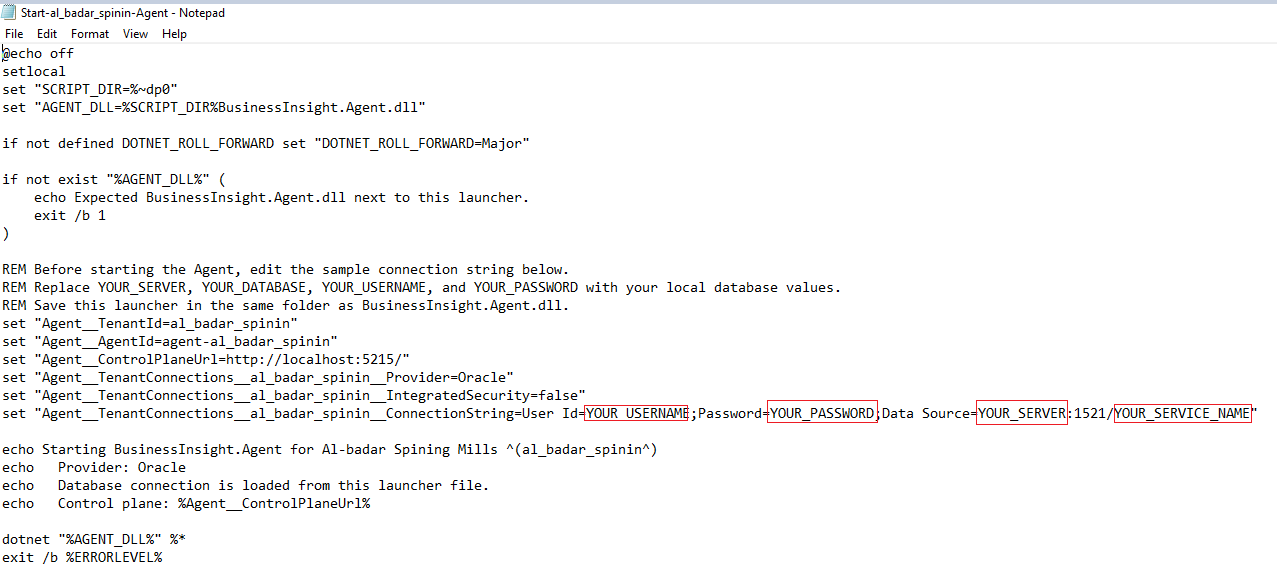
5. Connect the Agent to Your Company Data
The Agent reads the local client database connection string from the company launcher file in the Agent folder. Open the copied launcher, then replace the sample server, database, username, and password values with your local database values.
Recommended Setup
- Open the Agent folder.
- Right-click the copied Start-<tenant>-Agent.cmd file and choose Edit.
- Find the sample Agent__TenantConnections__...__ConnectionString line.
- Replace YOUR_SERVER, YOUR_DATABASE, YOUR_USERNAME, and YOUR_PASSWORD with the local client database values.
- Save the launcher in the Agent folder. Do not put another client's connection string in the same Agent folder.
Connection String Help
The launcher includes a starter connection string based on your selected database type. If you need another example, download the sample connection strings file and copy the matching pattern into the same launcher file.
For dashboard reporting, a read-only database login is usually enough. This limits risk because the Agent can read the data needed for charts without changing your business records.
6. Start the Agent
After the launcher is in the Agent folder and its connection string has been updated, start the Agent so BusinessInsight can see your company data.
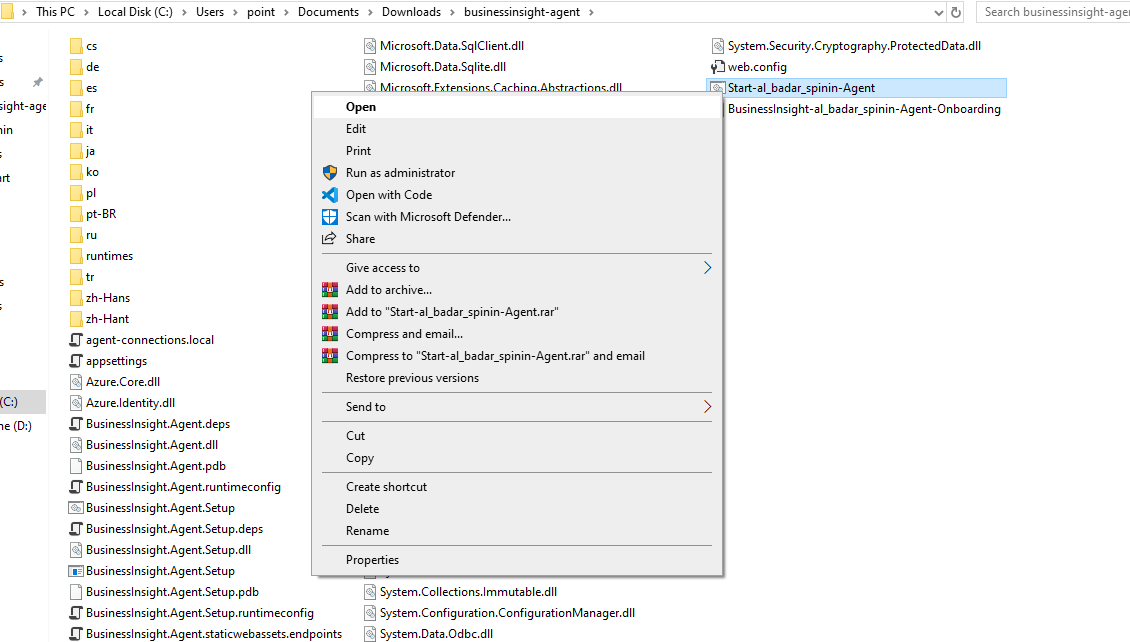
Find the folder where you extracted the Agent package and copied the company launcher.
Right-click the Start-<tenant>-Agent.cmd file and choose Open. If Windows asks for confirmation, confirm only if the file came from your BusinessInsight signup page.
When the Agent starts successfully, it registers with BusinessInsight and keeps listening for dashboard requests. Keep the window open during setup and testing.
Check that the launcher is in the same folder as the Agent files and that the sample connection string was replaced with the real local database values. If the launcher is missing, download it again from the trial success page.
7. Login as Admin to create widgets
After the agent is running, log in as an admin to create and manage widgets.
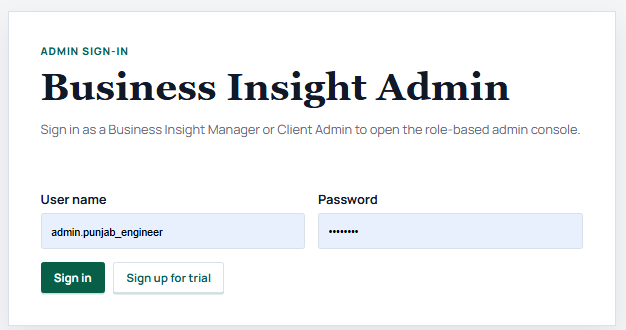
Purpose
This screen verifies the user before any company, role, dashboard, or widget configuration is shown. It protects tenant setup and prevents non-admin users from opening the administration console.
How to use it
- Enter the assigned admin user name.
- Enter the password provided during setup or activation.
- Click Sign in to open the client admin workspace.
- Use Sign up for trial when a new company wants to start onboarding.
8. Sign In and View Data on Mobile
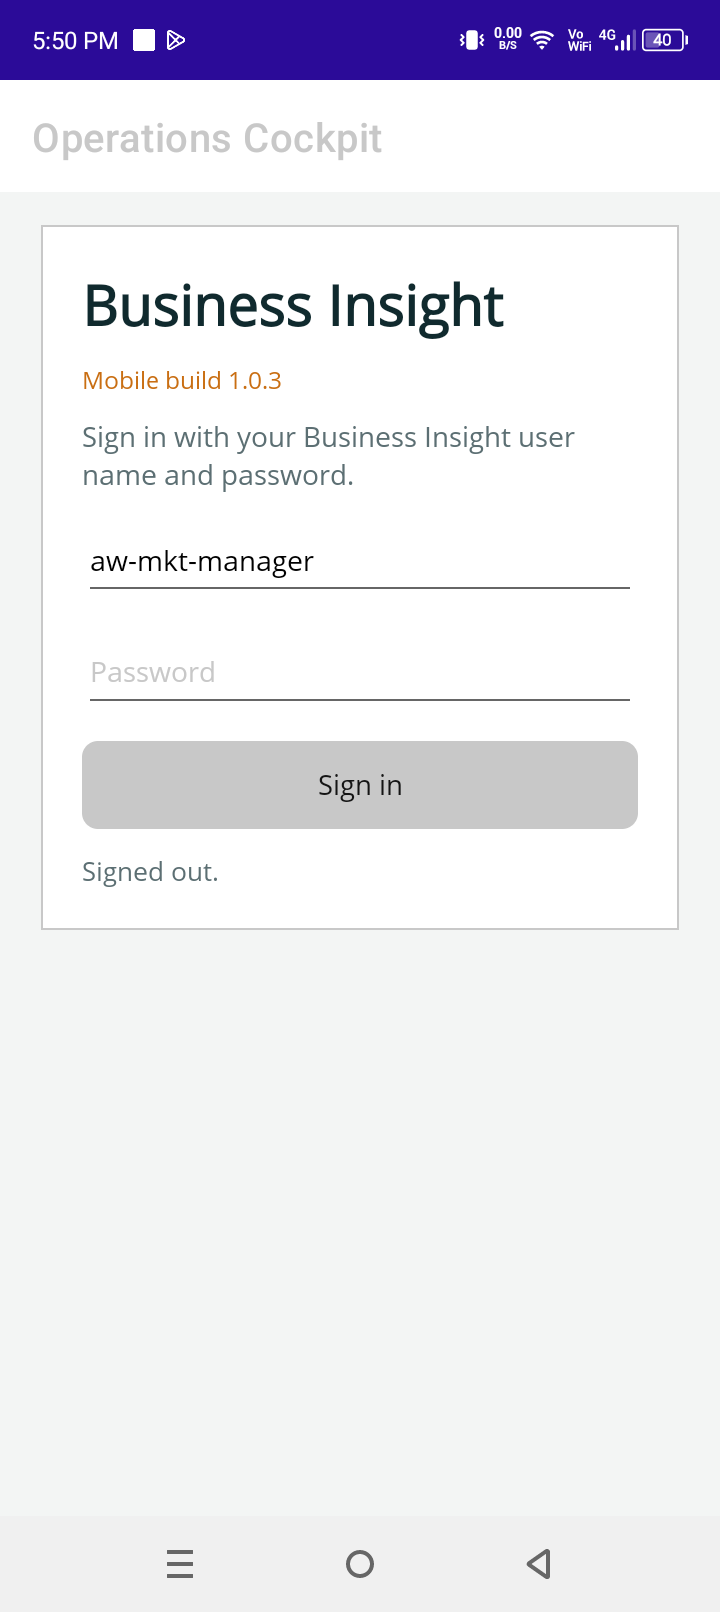
Admin First Sign-In
- Open the BusinessInsight sign-in page.
- Enter the Client Admin user name and password saved from trial signup.
- Confirm that your company dashboard setup is available.
Mobile User Experience
Once roles, users, dashboards, and widgets are prepared, mobile users can sign in and view live cards, charts, summaries, and alerts based on the data coming through the Agent.
Quick Checklist
- Trial signup submitted.
- Tenant ID, Agent ID, admin user name, and admin password saved.
- Company-specific Agent launcher downloaded.
- Agent package downloaded and unzipped.
- Launcher copied into the Agent folder.
- Launcher connection string updated with the local client database values.
- Agent started successfully.
- Client Admin can sign in.
- Mobile users can open their assigned dashboards.